20-08-2017  (14124 ) Categoria: Soldering

T12-HAKKO (907ESD) and SOLOMON (SL-10/30) - PROTO

ARTICLES

Soldering Iron Driver

File:SID LP front.jpg

Universal Soldering Iron Driver capable of driving both thermocouple and PTC type soldering irons.

Read about the design.

[Available for $7.00] at Seeed Studio.


Contents

[hide]

Features

Project Summary

Name: Soldering Iron Driver
Buy it: [ Get one for $7.00 at Seeed Studio]
Price: $7.00
Status: [[Project status#Development_status|]]
Manufacturing: Shipping
Forum: [ Soldering Iron Driver Forum]

The Soldering Iron Controller was designed by Arhi (Bogdan Kecman) and shared under public domain in our forums. With his consent we developed our through hole version based on the 3rd generation of his driver.

From the get go the Soldering Iron Driver was conceived to drive Hakko 900M (clones) and Solomon irons. As an added bonus it was discovered Weller PES51 irons were compatible as well.

The key to this universal design is the analog front-end which is capable of reading both Thermocouple and PTC temperature sensors. The SID features:

  • Compatible with any PTC or TC soldering iron.
  • PID temperature control.
  • USB data transfer, and firmware update.
  • UART data transfer.
  • HD44780 2x16 character LCD.
  • external NTC temperature sensor, for calibration and better cold junction compensation of TC type sensors.
  • Low noise, zero crossing AC heater control.

Hardware

600px

The hardware was developed by Arhi in the forum. His initial gen1 design used a PIC16F690 soldered on a perfboard. Since then he moved to the PIC18F2550 in gen2 and gen3. Images below are of gen2(left) and gen3 right), pictured above is our through hole version of gen3.

SID gen2c.jpgSID gen3.jpg.

How-to

Tested soldering irons

  • Hakko 900 series, and clones (PTC sensor)
    • HAKKO 907 iron
    • HAKKO 908 iron
    • QUICK 907A iron (HAKKO clone, different characteristics of the sensor)
    • GORDAK iron (HAKKO clone, different characteristics of the sensor)
    • ATTEN iron (HAKKO clone, different characteristics of the sensor)
    • NONAME HAKKO clone (identical RTD characteristics)

Firmware

There are two versions of the firmware, one for controlling the device with buttons, another for controlling it via an encoder.

Development resources

Download

Resources

License

  • Hardware: CC-0 (public domain)
  • Firmware: CC-AL (Creative Commons Attribution Licen

HAKKO (907ESD) and SOLOMON (SL-10/30) soldering iron driver

Postby arhi » Wed Jun 22, 2011 11:19 am

I found few minutes to redraw my soldering station driver so I can send it to itead before I go to vacation :) ... software is still not done (the old one works but is not using encoder, not reading thermocouple properly etc etc ..)

Upgrades from v1
1. thermocouple is read properly. The circuit used to get the K-type to go 0-5V came from microchip's app note
2. 3 buttons are replaced with rotary encoder with button
3. DS18B20 is added to read ambient temperature (thermistor returns difference in temp between hot and cold join so you need to know temperature of the cold join to know what is the temp of the tip. I decided to go with DS18B20 because I just figured out I have 10+ of those in the drawer)

Software upgrades (not done yet)
1. deal with hardware upgrades
2. use PI or PID instead of simple hysteresis to control tip temperature

Future upgrades
1. make nicer PCB (I make ugly pcb's... especially when dealing with slow speeds like here)
2. there are some free pins that might be used for something ..


ONE SUPER IMPORTANT THING!!!
SID do not have a FUSE on the power input. You MUST HAVE FUSE!!! I do not use fuse on PCB because all fuses I have are for "wires" so I have 2.5A glass fuse on the wire bringing 24 VAC into the PCB. BE SURE TO ADD THAT FUSE. 2.1-2.5 A is what you need depending on what type of LCD you use. The whole circuit (48W heater + everything on board + standard lcd) takes 2100 mA MAX. On top of that you need current for lcd back light. I have here LCD's that pull 30 mA and I have some that pull 280 mA for the back light, and I used some earlier that pull a whole amper!!! Anyhow whatever you do ADD A DARN FUSE TO THE POWER INPUT!!! DO NOT TURN ON SID WITHOUT IT!!


LOOK HERE FOR UPGRADES

PIC16F690 BASED LATEST VERSION SCHEMATIC (NO PCB AVAILABLE)

PIC18F2550 BASED LATEST VERSION SCHEMATIC AND PCB

PIC18F2550 BASED LATEST VERSION HEX AND COF

SID source is moved to SourceForge so available there

CASES
DangerousPrototypes Version of the Soldering Iron Driver (all trough hole)

Description:
100% Brand New and High Quality
Warm Reminder: This product is a DIY product, you need to have professional knowledge and skills, we do not recommendbeginners to buy, unless someone who have the expertise to teach you. We do not provide instructionssimply provide technical support. Thank you for understandingProducts constantly updatedlate this product will remove three buttons, because the initial design of these keys are used to adjust the temperature, and later found this controller general in the case, the role of the keys completely replaced by the encoderer.
Size: 37*68mm
Input voltage: 16-24V
1. Compatiable with 936 Series and T12, T1 , T13 series of the handle , the system automatically recognize the type of handle , determine the type of the system in accordance with this type of handle thermometer for accurate temperature control .
2. Thermostat way support the encoderer , potentiometer and button to adjust the temperature , stepping encoderer thermostat 1 degree , buttons 5 degrees . The potentiometer according to the angle of rotation , the potentiometer can be used 1- 10K freely.
3. The switching function with four quick temperature finished encoderer pressed to switch four common temperature , followed by ABCD , the general temperature setting for A = 50 degrees B = 250 degrees C = 280 degrees D = 320 degrees . The boot default A file low temperature .
4. Four grades of fast temperature can customize, setting yourself up for 4 of the most commonly used temperature switch temperature profile, click encoderer switches to set the temperature, convenient and quick.Custom temperature method: after starting up, according to the encoderer, can enter into the A file temperature control menu, the rotary encoderer, the temperature will change accordingly, to reach their desired temperature, short click encoderer into B file set (as A files), followed by C files, D files.The last step is again according to the encoderer to save the current 4 temperature, it can later be at a 4 temperature quick select.
5. With a handle type lamp, the default is T12 type handle red, yellow or green represents 936 series type handle.
6. instructions with PWM function, using the handle indicator will flash according to pwm.
7. Can show the supply voltage (lower right corner of the display rotation), if it is your own diy controller uses a battery, especially the outfield friends, you can use this function to detect the power supply voltage. Indirectly determine the capacity of the battery.
8. Can display the temperature (with the upper corner of the display rotation), this temperature is used as the tip temperature compensation use. So that the actual temperature of the tip temperature is set by the system is not affected by ambient temperature.
9. Can display the boot time (top right corner of the display rotation).
10. Can show the percentage of heating power (lower right corner of the display rotation).
11. With automatic sleep function when not using the handle (handle static), or do not take the handle, soldering station into sleep, hibernate, soldering station stop heating, in line with low-carbon environment, and effective protection of the tip, to extend the use of tip lifetime.
12. Sleep Time can be customized to conduct their own set according to personal preferences and habits, is:
Hold down the shutdown encoderer (do not release) and then boot, then adjust the program into the background, press the encoderer, find 3/7 parameters, here the default sleep time is 300 seconds, then 300 for flashing, rotary encoderer, the number of seconds to adjust to their needs, and then press the encoderer to save the settings. Soldering station to restart.
13. Support temperature display system voltage adjust themselves
14. The system supports 18B20 thermal resistance and high-precision temperature sensor detects temperature. (Finished thermal resistance)
15. Supports three kinds of LCD interface, the standard seat 1602,1.0 pitch FPC (using ultra-small mini 1602) and Taiwan double LCD.
16. The temperature fluctuation is very small, when you can still about plus or minus 3 degrees.


______________________________________________________________________________________________________________________


Details

Key Function:

Fast cycle through the built-in 4-speed temperature (the default setting of 260-280-300-320)

Modify the built-in 4-speed temperature method:

1. Press the function key to enter the modification mode

2. Press the function key to select the number of modified files

3. Press the left, respectively, + and -, to be modified.

4. Press the function key to save and exit.

Power Supply: DC 12-24V, be careful not to reverse the polarity

Temperature setting range: 50-435 degrees

Note: when the iron temperature, equivalent thermocouple, polarity, if the pick the wrong line, and you can not control temperature, prolonged heating will burn.

The screen displays:

1. The four temperature settings (SA , SB , SC , SD)

2. boot time (rarely used)

3. T12 current temperature

4. Power supply voltage (Approximate values)


Package Included:

1x Mini 1602 LCD

1x T12 Digital Soldering Iron Station Temperature Controller

_________________________________________________________________________________________

Chinese Soldering Iron Driver (Warning/Info Search)

Postby sleemanj » Sat Apr 06, 2013 8:33 am

Bit of a warning, bit of a quest for anybody who might have more information.

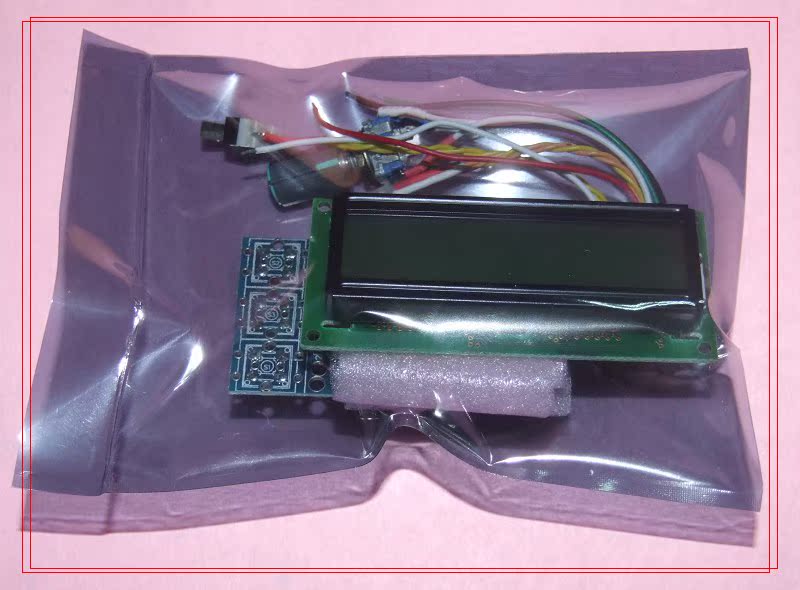
So a while back I bought one of these on Taobao...

T21Dx0XnVcXXXXXXXX_!!59070758.jpg
Chinese Soldering Iron Driver


http://item.taobao.com/item.htm?id=8686679296

68 Yuan, which with the shipping and agents etc came to about $17 USD in a larger order, worth a punt. Subsequently I found that these are also sold on eBay http://www.ebay.com.au/itm/Soldering-Iron-Station-Temperature-Controller-For-HAKKO-936-T12-T1-T13-Handle-/170969190905?pt=LH_DefaultDomain_0&hash=item27ce8ed1f9&_uhb=1#ht_7058wt_1399

The Taobao seller also has a mini version of it, and sells built up in cases also...
Image

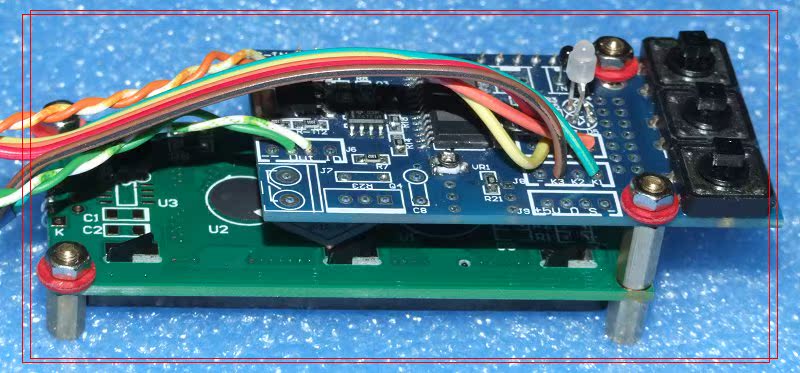
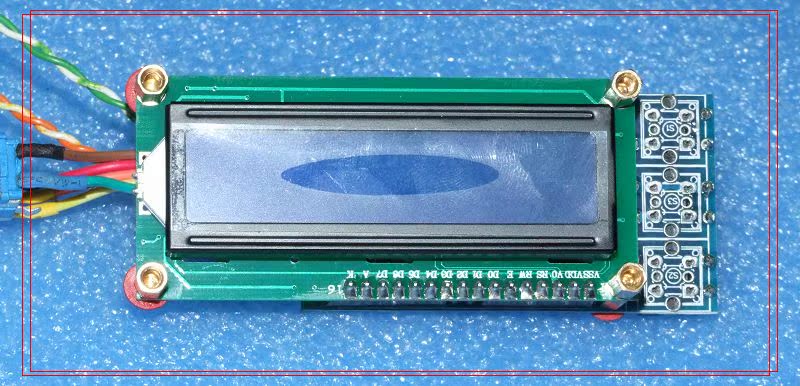
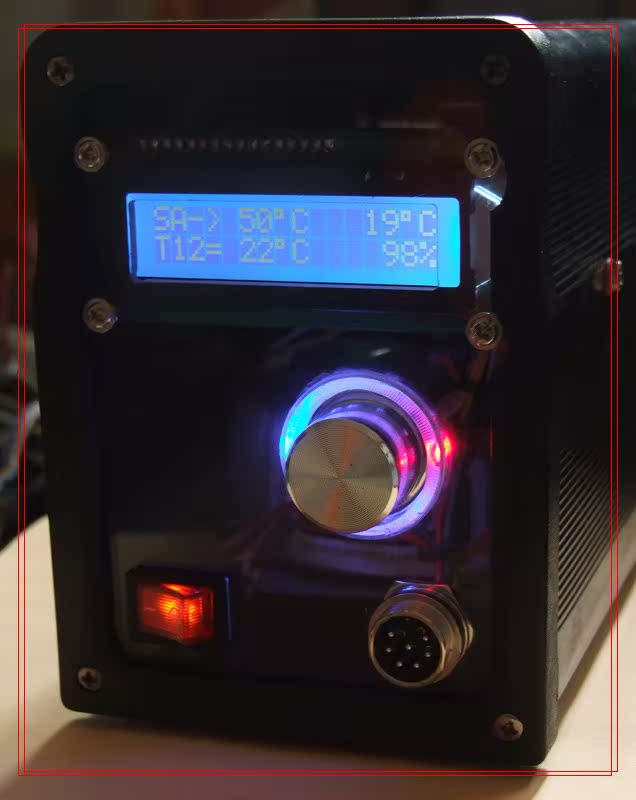
The silkscreen (and a display on the 1602 LCD) says it is "BG2001_V2" "By_LET".

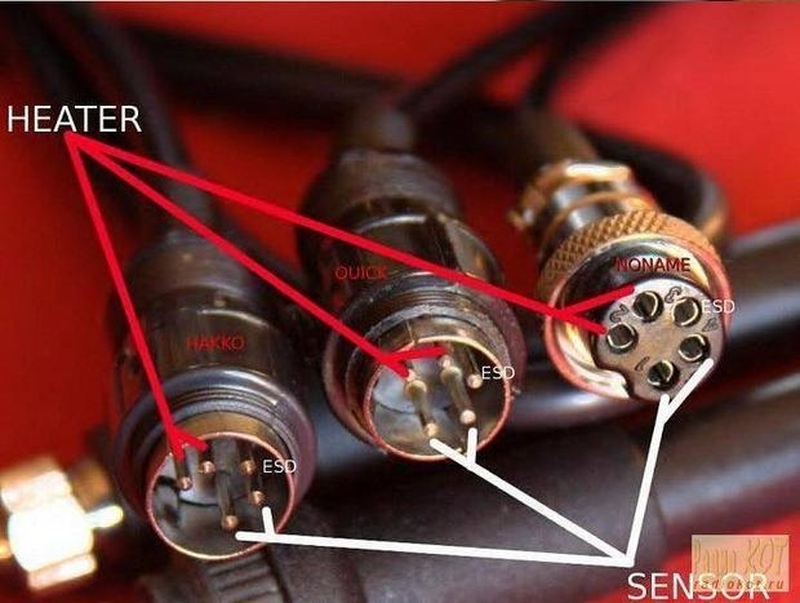
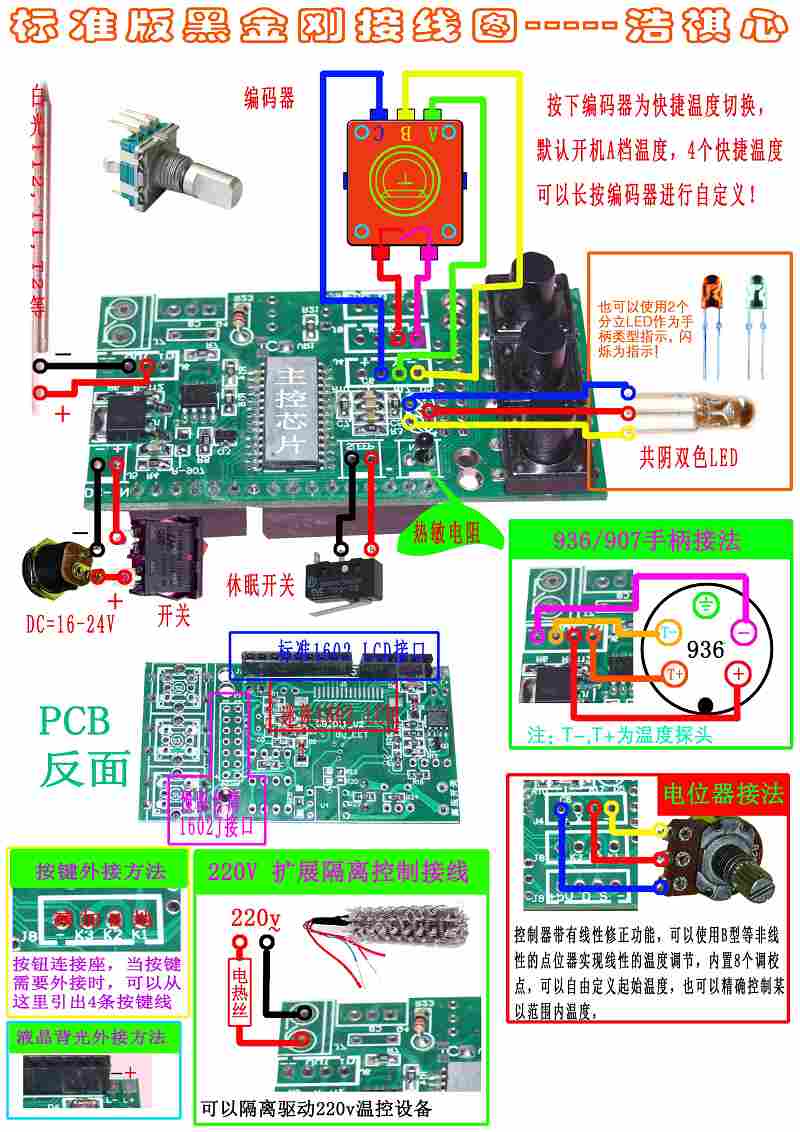
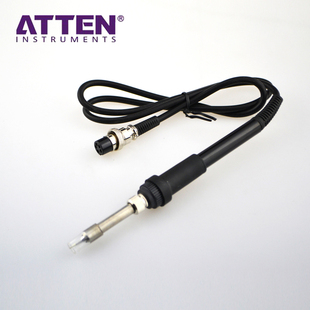
Anyway, supposedly (in so far as Google translate would allow) this supports standard Hakko 936 irons (and the T12 type which seem to be the most common in China for some reason), also supports 4 presets, automatic sleep, DC input in a wide range, input via encoderer or buttons. I have finally got around to wiring it up as best I can figure from the diagram. It detects a Hakko 907 handle as a 936 ok, and drives the element, unfortunately it just doesn't seem to be able to read the thermistor at all, the iron temperature readout seems locked to the ambient temperature (but the iron heats up in a matter of seconds, it's not a delay thing, the element is being driven flat out at 100% PWM).

It DOES know the thermistor is there, if I disconnect it, it reverts to T12 mode. I tried putting a pot in place of the thermistor connection and twiddling that flips between 936 and T12 mode around 300 Ohm I think (more becomes T12 and the iron temperature indication changes, less becomes 936 and the iron temperature display seems to lock to ambient [and drives at 100%]). So far as I know the handle's thermistor is working - at least, the resistance across it changes with the application of heat to the tip of the iron. I think the 907/936 irons are just a simple thermistor.

What I suspect, is that the controller simply doesn't support 936 handles (907 etc) properly, since it seems everybody in China uses the T12 based irons. All the images show T12 irons in use, none show 936. So yeah, a warning, if you want to use a Hakko 900 series handle, these controllers possibly don't work as best I can figure, despite what they sellers say.

I guess it could be a configuration thing that has to be twiddled - if you hold the encoderer button when powering up you enter a config mode where there are 7 different options you can change, some of them I have worked out, but some are just a number without any sort of notion was to what they do (if anything). So, if anybody has bought one of these (I see the ebay seller has flogged off a few of them) and had success with a 907 handle, please post below!

Image


_________________________________________________________________________________________________________________________________

sleemanj
Jr. Member
Jr. Member

Posts: 53
Joined: Wed Mar 13, 2013 3:02 am
Location: New Zealand

Re: Chinese Soldering Iron Driver (Warning/Info Search)

Postby sparkybg » Mon Apr 08, 2013 8:02 pm

I suspect it is made for a thermocouple, not thermistor. And thermocouple "simulates" a changing thermistor pretty good when you measure the resistance with a multimeter. Since the thermistors used by Hakko/Weller/etc are more expensive than a thermocouple, it is possible that this is the case.

Try using an iron with thermocouple and you will find out if I am right.

...also, I suggest you to try these T12 irons. The tips are very compact and well made. And 70W. I am using these (I am not from China :) ), and I don't want to hear about anything else. They heat up VERY fast and you can use them for anything from a TO247 to TQFP with 0.4mm spacing.
sparkybg
Hero Member
Hero Member

Posts: 669
Joined: Tue Feb 26, 2013 3:30 pm
Location: Sofia, Bulgaria

Re: Chinese Soldering Iron Driver (Warning/Info Search)

Postby sleemanj » Thu Apr 11, 2013 4:03 am

sparkybg wrote:I suspect it is made for a thermocouple, not thermistor.


Yep. It definately is. I did some more research on the matter after my post, and actually there's a mention here I think by Arhi that there is a big difference between the thermocouple characteristics in the Hakko 907 and the knock-offs.

The knock-offs are N-type (from memory) thermocouple and can be identified by a resistance around 2 ohm, the resistance of the Hakko's is much higher (60 ohm from memory).

Anyway I'm going to order a couple of the knock-off elements ("A1322") (for a buck a piece or something) to confirm, later in the month. But 99% sure that's what the issue is.

PS: Anybody reading from NZ who might want one, let me know, loosely thinking about importing a few for resale if they prove to be decent enough.
~~~
James Sleeman

Fellow Kiwis, see my hobby electronics, maker supplies for sale in New Zealand
sleemanj
Jr. Member
Jr. Member

Posts: 53
Joined: Wed Mar 13, 2013 3:02 am
Location: New Zealand

Re: Chinese Soldering Iron Driver (Warning/Info Search)

Postby dtmf » Tue Apr 16, 2013 12:28 pm

Some settings.
Attachments
DSC_0839.jpg
dtmf
Newbie
Newbie

Posts: 25
Joined: Sun Mar 10, 2013 3:52 pm
Location: Bulgaria

Re: Chinese Soldering Iron Driver (Warning/Info Search)

Postby dtmf » Tue Apr 16, 2013 1:58 pm

Chinese Ya Xun Hakko clone with J- type thermocople works Ok like 936 : ))
dtmf
Newbie
Newbie

Posts: 25
Joined: Sun Mar 10, 2013 3:52 pm
Location: Bulgaria

Re: Chinese Soldering Iron Driver (Warning/Info Search)

Postby dtmf » Tue Apr 16, 2013 3:09 pm

Missing parts for T12 accuracy. No more 50C error.
Attachments
DSC_0841.jpg
DSC_0840.jpg
dtmf
Newbie
Newbie

Posts: 25
Joined: Sun Mar 10, 2013 3:52 pm
Location: Bulgaria

Re: Chinese Soldering Iron Driver (Warning/Info Search)

Postby sleemanj » Tue Apr 16, 2013 9:05 pm

dtmf wrote:Some settings.


The following are the setting instructions in Simplified Chinese which I extracted from an image and cleaned up. Unfortunately it's still too hard to get a very useful OCR of this to work well, let alone machine translation. 

Perhaps somebody who knows somebody who can read Simplified Chinese could translate this.

Soldeing-Iron-Setup.png


This is the "best" machine translation I could get, 
Code: Select all
Vibration Sleep
= TI2 mild control l do not change u
Coding or press
Type, 0 = imports TL2, non-0 = domestic T12
Potentiometer, non-zero
In seconds, the default time for the Chi cell
0: NC Sleep, Sleep: normally open, 2 setting [] = L0AD factory settings, non-0: Normal mode
Fixed temperature probe for thermal resistance, leave it 0
Type, 0 Single
Class l the seed storage Bu l group of people the m probe by the branded side deep sting Mian Mian temperature for summer and warm in normal operating doors ggg control recovery
The lie. The the L_ very few fq Shanzhunxunyan. Qiu


I believe that the first item (0) item 4 is to do with selecting the sleep switch, either microswitch or vibration sensor. And I can see there is some sort of temperature probe setting, adjusting PID perhaps.

soldering-2.png
soldering-2.png (97.37 KiB) Viewed 19753 times
~~~
James Sleeman

Fellow Kiwis, see my hobby electronics, maker supplies for sale in New Zealand
sleemanj
Jr. Member
Jr. Member

Posts: 53
Joined: Wed Mar 13, 2013 3:02 am
Location: New Zealand

Re: Chinese Soldering Iron Driver (Warning/Info Search)

Postby ivanko100 » Sat May 11, 2013 4:18 am

Hello, what are the factory settings from FIX0 to FIX6 for T12 tip? Can somebody explain the meanings of menu values for menu 0 to 7 in FIX0 and what are the settings for T12 tip in the FIX0 to FIX6 menues.
ivanko100
Newbie
Newbie

Posts: 1
Joined: Fri May 10, 2013 11:21 am

Re: Chinese Soldering Iron Driver (Warning/Info Search)

Postby sleemanj » Sat May 11, 2013 8:12 pm

Just a followup, I procured a chinese variety 936 handle (and a few A1322 elements, again the chinese variety) for crazy cheap, and they work with this driver fine (I havn't actually measured the tip for accuracy, but operationally it works). I did have to switch the polarity of my sensor connectors on the socket, don't know if that's because I initailly wired them backwards, or if the knock-offs use reversed polarity. 

The handle cost me $1.99 USD + the various shipping & fees (the final price about $6.00 USD, part of a larger order)
The extra elements cost me $0.42 each + the various shipping & fees (final price about $0.91 USD, part of a larger order)

So ignoring my mistaken Hakko handle purchase, total cost to me was about $30 USD, plus the old laptop power supply from my junk drawer.
~~~
James Sleeman

Fellow Kiwis, see my hobby electronics, maker supplies for sale in New Zealand
sleemanj
Jr. Member
Jr. Member

Posts: 53
Joined: Wed Mar 13, 2013 3:02 am
Location: New Zealand

Re: Chinese Soldering Iron Driver (Warning/Info Search)

Postby Khaderah » Thu Jun 13, 2013 5:36 am

Meanings of menu values for menu 0 to 7 in FIX0 and the settings for T12 tip in the FIX0 to FIX6 menues
The following are the setting in fix table
Attachments
Table.png
Khaderah
Newbie
Newbie

Posts: 1
Joined: Thu Jun 13, 2013 5:26 am

Re: Chinese Soldering Iron Driver (Warning/Info Search)

Postby netrunner » Sat Nov 01, 2014 7:50 am

Hi, I'm reviving this thread for the benefit of all who struggle with this.

It is still available on Ebay and it still does not work with the 907 handel (or mine handel was DOA).

The 936 handel worked well.

Here's the link to the 936 handel (no, I do not work there) (ah, new users can not post link... ok) Ebay item 371148118721

If the link is dead, look for one that has a black plastic cover for the soldering tip.

In the absence of the right type of DIN connector, I cut the cable. Sensor has about 1.5 ohms resistance. Solder the cable directly to the control it is "red" cabel that is the sensor "plus".

Thanks for all the tips in the thread! Without that it had gone in the bin.
netrunner
Newbie
Newbie

Posts: 1
Joined: Sat Nov 01, 2014 7:29 am

Re: Chinese Soldering Iron Driver (Warning/Info Search)

Postby neslekkim » Sat Nov 01, 2014 8:13 am

Gah.. you made me look again for these on ebay :), and found that they have come with new "clones":

http://www.ebay.com/itm/111453022705

Kinda look nice, with the 9501 handle it should do good.
neslekkim
Sr. Member
Sr. Member

Posts: 349
Joined: Tue Sep 11, 2012 5:36 am
Location: Oslo, Norway

Re: Chinese Soldering Iron Driver (Warning/Info Search)

Postby igorsd » Fri Jan 01, 2016 6:59 pm

sleemanj wrote:Bit of a warning, bit of a quest for anybody who might have more information.
The Taobao seller also has a mini version of it, and sells built up in cases also...

I just ordered this "mini" controller, but from other seller on aliexpress, for € 9,98.
I want to hear your opinions, about connections in upper left corner on picture below:
s-l500a.jpg

Could it be posible to connect encoderer to + X Y - pins, and how?

And below right connector I see resistor and marks t-12 and 907. I guess that we can choose which handle (heater) will be used.

I will inform you with detailed pics when it come to me.
igorsd
Newbie
Newbie

Posts: 2
Joined: Fri Jan 01, 2016 6:29 pm

Re: Chinese Soldering Iron Driver (Warning/Info Search)

Postby igorsd » Fri Jan 01, 2016 7:10 pm

I also found this, translated diagram, maiby will be usefull for somebody.
s-l1600.jpg
igorsd
Newbie
Newbie

Posts: 2
Joined: Fri Jan 01, 2016 6:29 pm

_________________________________________________________________________________________________________________________________

Really universal soldering controller

Really universal soldering controller

Postby sparkybg » Thu May 14, 2015 11:18 am

Well, here it is, at last.

UniSolder52_small.jpg


The intention was to build the most universal soldering controller I can think of. It can drive any low voltage (upto 24V) iron with thermocouple or resistive sensor, in series with the heater, or separate.

Here is a short list of features:
- power: 9-28V, AC or DC
- 2 separate heater control channels
- 2 independent sensor inputs
- current source on any sensor input 3uA - 12mA, wuth 2 bands (x1, x16) and 256 steps per band
- flexible differential amplifier input selection
- amplifier gain from 0 to 750 in 256 steps
- negative offset selection in 1024 steps
- resistive instrument identification (upto 625 different instruments can be identified by 2 resistors on the connector)
- polynomial floating point voltage/resistance to temperature calculation
- wave shaping to filter out the inductive peaks from series sensor signal
- PID control with power limit
- isolated USB port for firmware updates and live data
- 128x64 OLED display with rich user interface.

Tested so far with:
- HAKKO T12/T15 (series TC)
- HAKKO FX8801 (PTC)
- PACE TD100 (series TC)
- JBC C245 (series or separate TC)
- JBC C210 (series TC)
- JBC Microtweezers (2 separate heaters, each with series TC)
- WELLER WSP80 (PTC) (This iron was sent to me by a reader of the thread for a previous version of the controller. Thanks, Jaroslaw) 
- ERSA RT80 (series PTC/heater resistance)
- various chinese cheap irons with separate TC

Here are the schematics, gerbers and software (4 April 2017):
UniSolder52_Schematics.zip
(332.36 KiB) Downloaded 4938 times

UniSolder52_gerber.rar
(436.38 KiB) Downloaded 3139 times

UniSolder52_BOM.zip
(13.47 KiB) Downloaded 3027 times

UniSolder52_Software.zip
(1.37 MiB) Downloaded 1944 times


Update (4 April 2017): The PC Software is now entirely in C#, the front end is rewritten. Now you can program only the bootloader, and then use the software for firmware updates using the USB connection. The PC software also does not crash anymore when device is unplugged and plugged in the USB or turned on/off, and automatically switches to bootloader and back when uploading new firmware. Also, a legend with checkboxes is added for every data that is displayed on the graph, so you can switch it on or off. There is still pretty much work to be done on it, but at least it is much more functional now.
Added to the firmware are Pace TD100 Black and Weller WMRT profiles, some work is done on several other places. Now the firmware handles better some irons, where there was initial overshoot when heating for the first time or changing the target temperature.

Some movies:
JBC C245: https://www.youtube.com/watch?v=oTdQB4y ... e=youtu.be
JBC C210: https://www.youtube.com/watch?v=iyz-EDf ... e=youtu.be
T12, JBC C210, JBC Microtweezers: https://www.youtube.com/watch?v=-f0KSU0PJzc&t=70s
Chinese T12: https://www.youtube.com/watch?v=u588sh- ... e=youtu.be
Weller WSP80: https://www.youtube.com/watch?v=gd_8w7l ... e=youtu.be
Weller WMRT: https://www.youtube.com/watch?v=eHNJuQE ... e=youtu.be

A comparison of irons/tips used in the movies:
Image

The calibration precedure:
- Connect a resistor with well known resistance (0.1%) of around 10ohm between SENSEA and Vout1-
- Go to "CALIBRATION" submenu
- Adjust the calibration trimmer until you get value of "R" as close as possible to the resistance of the resistor, multiplied by 100 (1000 for 10ohm resistor).

On the left - calibration "fixture" with soldered 9.8ohm resistor, on the right - my connector layout:
UniSolder52_Cal_Con-1.jpg


Connections to different tips/irons:

1. HAKKO T12:
- Outer shell, and heater negative (middle) terminal connected together to Vout1- and EARTH
- heater positive (bottom terminal) connected to Vout1+ and SENSEA
- 1k resistor between ID and Vout1-
- 5.6k resistor between ID and Vout2-

2. HAKKO FX8801, HAKKO 907 (original, with PTC sensor):
- Outer shell, PTC negative and heater negative connected to EARTH, Vout1- and SENSEB
- Heater positive connected to Vout1+
- PTC positive connected to SENSEA
- 1k between ID and Vout1-
- 820ohm between ID and Vout2-

3. JBC C245:
- Outer shell (green wire) connected to EARTH and SENSEB
- Heater positive(red wire) connected to Vout1- and SENSEA
- Heater negative(blue wire) connected to Vout1+
- 150ohm between ID and Vout1-
- 5.6k between ID and Vout2-

4. JBC C210:
- Outer shell (green wire) connected to EARTH and SENSEB
- Heater negative (middle terminal, blue wire) connected to Vout1-
- Heater positive (smaller terminal, red wire) connected to Vout1+ and SENSEA
- 3.0k between ID and Vout1-
- 5.6k between ID and Vout2-

5. JBC Microtweezers:
- Outer shell of both tips (green wire) connected to EARTH
- Heater 1 negative (blue wire) connected to Vout1-
- Heater 1 positive (red wire) connected to Vout1+ and SENSEA
- Heater 2 negative (brown wire) connected to Vout2-
- Heater 2 positive (yellow wire) connected to Vout2+ and SENSEB
- 1.0k between ID and Vout1-

6. WELLER WSP80:
- Outer shell, PTC negative and heater negative (white, black and brown wires) connected to EARTH, Vout1- and SENSEB
- Heater positive (blue wire) connected to Vout1+
- PTC positive (red wire) connected to SENSEA
- 120ohm between ID and Vout1-
- 5.6k between ID and Vout2-

7. ERSA RT80:
- Outer shell and Heater/PTC negative (pink and white wires) connected to EARTH, Vout1- and SENSEB
- Heater/PTC positive (black wire) connected to Vout1+ and SENSEA
- 300ohm between ID and Vout1-
- 110ohm between ID and Vout2-


__________________________________________________________________

Més imatges per a how vibration sensor Switch Used in soldering ironsInformeu de les imatges

Soldering apparatus with safety device - Japan Unix Co., Ltd.

www.freepatentsonline.com/6111222.html
29 d’ag. 2000 - A vibration sensor is attached to the soldering iron to sense ... soldering iron for sensing vibrations of said soldering iron at the use of said soldering iron; and ... A soldering apparatus as defined in claim 2, wherein said switch ...

[PDF]Soldering Station - MCM Electronics

www.mcmelectronics.com/content/.../Manuals/21-19650.pdf
This appliance can be used by children aged form 8 years and above and persons with reduced ... Thank you for purchasing the 21-19650 Soldering Station. Please read the .... Turn OFF the main power switch and unplug the device from power source .... The Soldering Iron is equipped with a vibration sensor. When the.

DangerousPrototypes.com forum • View topic - Chinese Soldering ...

dangerousprototypes.com/forum/viewtopic.php?f=19&t...
6 d’abr. 2013 - 15 entrades - ‎8 autors
All the images show T12 irons in use, none show 936. .... item 4 is to do with selecting the sleep switch, either microswitch or vibration sensor.
Heu visitat aquesta pàgina el dia 19/08/17.
18 de gen. 2014 - Penjat per gammypoofle
Update: I contacted Wiltec, the supplier, and they in their turn seem to have contacted Aoyue. They immediately ...

How to Make Simple "motion" Sensors: 6 Steps

www.instructables.com/.../How-to-make-simple-%22motion...
The first one is a ball-based vibration detector. ... This is the sensor used in my other project, home-made Guitar Hero controller. ... soldering-iron and some solder .... I was looking for a way to make a motion sensitive switch for a bird toy.

Soldering to Desoldering Station Hack: 5 Steps

www.instructables.com/.../Soldering-to-Desoldering-Station-...
I had a soldering iron holder from an older station I no longer use. And I also needed to ... White wire - trigger switch contact, NO press-to-make switch. 6. ... After ditching the vibration sensor output, that's still one connection too many. I decided ...

JINGLE WORLD CO.,LTD-VIBRATION SENSOR,VIBRATION SWITCH ...

www.jingleworld.com.tw/e-pro-004.htm
So it could be used in widespread of the electronic products. ... Sn temperature(Solder iron):400 ± 10 ℃/ 5 sec (In Temperature 25 ± 3℃, Humidity 55 ± 20% ...
Can also be used for impact sensing or a flexible switch. Comes with solder pins that allows for vertical mounting. Features: Flexible PVDF Piezo Polymer Film ...

Soldering Iron | RS Components

uk.rs-online.com/web/generalDisplay.html?id.../soldering-iro...

... Signal Generators & Analysers (283) · Sound & Vibration Measurement (72) · Temperature ... These “temperature controlled irons” include a temperature sensor and a ... While the tip remains magnetic, a switch delivering power to the element is held ... The soldering iron is frequently used in low-level production work in ...

_

This is the sensor used in my other project, home-made Guitar Hero controller. ... an iron ball (e.g. from a ball bearing system) - of course proportional to the ... You need to solder the ball and the spring together like you can see it on the picture. ... As you change the position of the sensor (a few degrees from horizontal) the ...
Hacking a PIR Motion Sensor for Use As a Triggering Device. ... You should also tin them at this time using a soldering iron. ... Relay Ground is switch -
A soldering gun is an approximately pistol-shaped, electrically powered tool for soldering metals using tin-based solder to achieve a strong mechanical bond with good electrical contact. The tool has a trigger-style switch so it can be easily operated with one hand. ... Pistol-grip electrically-heated soldering tools had been used since the 1920s ...
Falta: ensor
The BMP180 Breakout is a barometric pressure sensor with an I2C (“Wire”) interface. ... this sensor to an Arduino microcontroller and use the included software library to ... For this example, we'll solder on a five-pin length of male-male header strip, ... IMPORTANT: Connect the power pins (+ and -) ONLY to a 3.3V supply.

Soldering station cannot be switched on ... Soldering iron inserted in receptacle, LED not flashing ... WSD station is not used within a period of 30 minutes the temperature will be ... Fast and easy tip exchange 3. Optimal ... An optimal technology where heating element an sensor technology are integrated in the soldering tip.

___________________________________________________________________


versió per imprimir